Tutorial: Adding an SD card reader to your Linksys WRT54G

Tutorial: Adding an SD card reader to your Linksys WRT54G |
|
| By Rasmus Rohde and Mads Ulrik Kristoffersen |
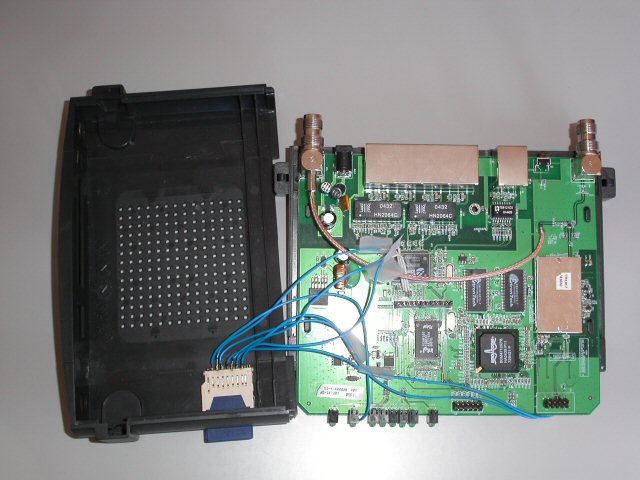
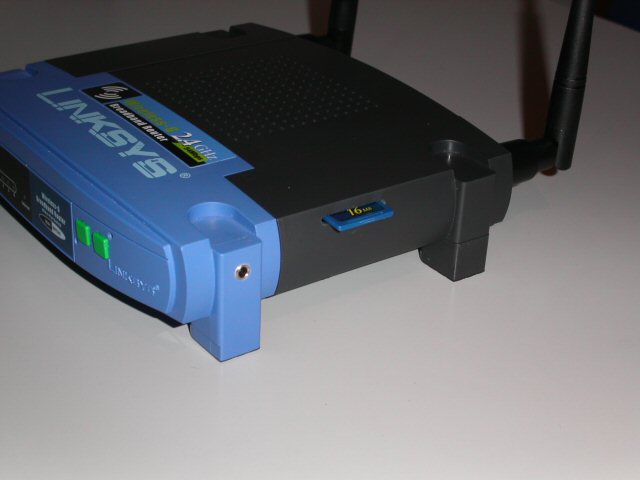
This project is for people who would like to add a little storage to their Linksys WRT54G router besides the builtin 4MB flash ram. What we will do is connect an SD card reader to some of the GPIO pins of the CPU found inside the Linksys and with the help of a little driver we can use as a block device from Linux. This means that if you compile your kernel for the Linksys with e.g. support for MSDOS partitions and VFAT you will be able to mount, read, write, partition and so on your normal SD cards. The speed obtainable for reading and writing seems to be about 200 KB/s.
 |
|
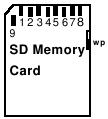
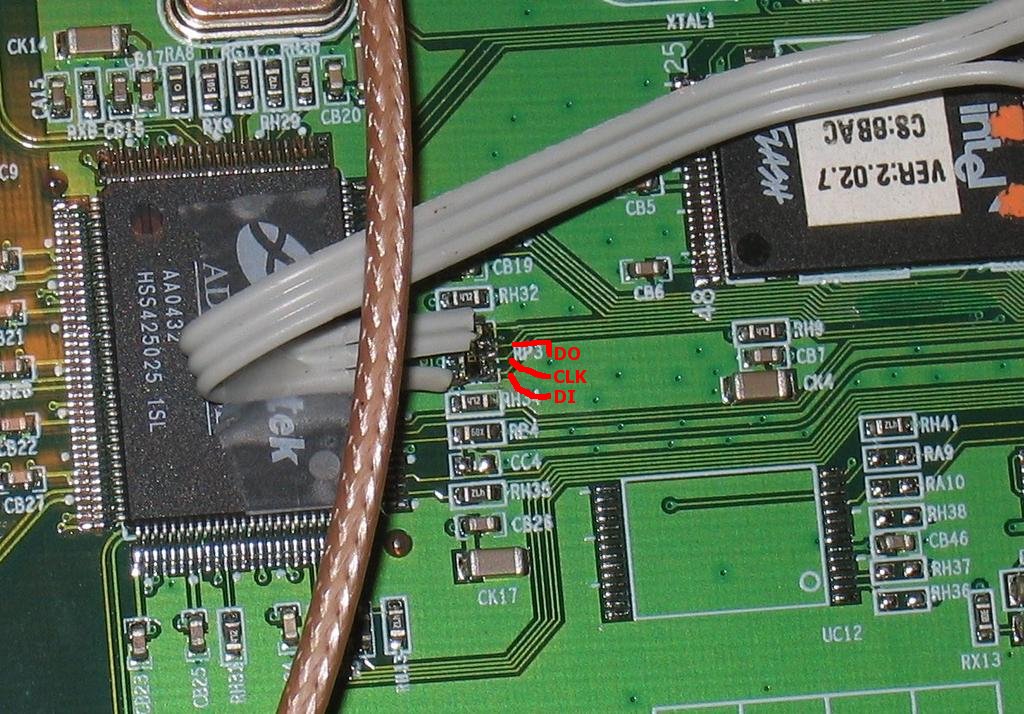
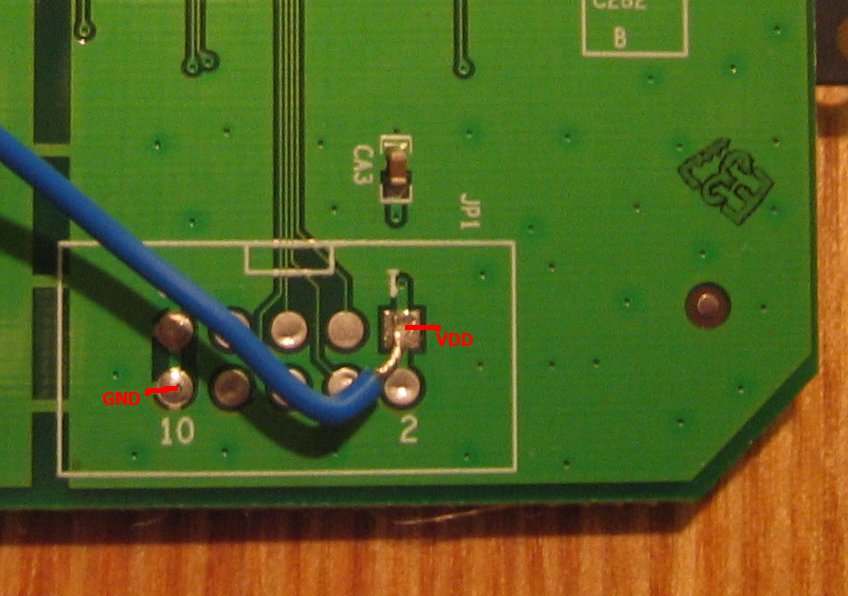
We will be driving the SD card in SPI mode, meaning that only one of the four data out pins are used (pin 7). Obtaining the specs for driving the card in the native SD mode is VERY costly and furthermore the limited number of GPIO pins available inside the router also mandates the use of some sort of serial protocol. The two VSS pins can simply be wired together for this project (VSS2 is used to control the sleep mode of the card). With this in mind lets look at the solder points in the router.
First of all we suggest that you configure a kernel with support for MSDOS partitions and VFAT. Partition support must be built into the kernel whereas VFAT can be built both as a module or into the kernel. These are some things you may want to include in your .config:
CONFIG_PARTITION_ADVANCED=y
CONFIG_MSDOS_PARTITION=y
CONFIG_FAT_FS=y
CONFIG_MSDOS_FS=y
CONFIG_VFAT_FS=y
Now get the driver and the Makefile. You will need to modify the Makefile to point to where your OpenWRT linux kernel headers are and also the mipsel compiler location. When that is done just type make (ignore the warnings - they are ok).
The module is now ready to be inserted. Make sure a card is placed in the reader and then load the module. Check with dmesg that everything went ok, and hopefully you should now have some new devices in /dev/mmc/... Here is a little snippet of a "conversation" with the router
root@radio:~# ls -al /lib/modules/2.4.20/
drwxr-xr-x    1 root     root            0 Jan  1 00:08 .
drwxr-xr-x    1 root     root            0 Jan  1 00:01 ..
lrwxrwxrwx    1 root     root           28 Jan  1 00:01 et.o -> /rom/lib/modules/2.4.20/et.o
-rw-r--r--    1 root     root        50616 Jan  1 00:02 fat.o
-rw-r--r--    1 root     root        12780 Jan  1 00:08 mmc.o
-rw-r--r--    1 root     root        11244 Jan  1 00:03 msdos.o
-rw-r--r--    1 root     root        19156 Jan  1 00:05 vfat.o
lrwxrwxrwx    1 root     root           28 Jan  1 00:01 wl.o -> /rom/lib/modules/2.4.20/wl.o
root@radio:~# insmod mmc
Using /lib/modules/2.4.20/mmc.o
root@radio:~# dmesg | tail -7
mmc Hardware init
mmc Card init
mmc Card init *1*
mmc Card init *2*
Size = 249856, hardsectsize = 512, sectors = 499712
Partition check:
 mmca: p1
root@radio:~# insmod fat
Using /lib/modules/2.4.20/fat.o
root@radio:~# insmod msdos
Using /lib/modules/2.4.20/msdos.o
root@radio:~# mount /dev/mmc/disc0/part1 /mnt -tmsdos
root@radio:~# ls -al /mnt
drwxr-xr-x    2 root     root        16384 Jan  1  1970 .
drwxr-xr-x    1 root     root            0 Jan  1 00:01 ..
-rwxr-xr-x    1 root     root            0 Jan  1 00:07 bossepr0.pic
-rwxr-xr-x    1 root     root        22646 Jan  1 00:02 ld-uclib.so
-rwxr-xr-x    1 root     root        12780 Jan  1  2000 mmc.o
-rwxr-xr-x    1 root     root      1048576 Jan  1  2000 temp.bin
-rwxr-xr-x    1 root     root     16777216 Jan  1  2000 temp2.bin
-rwxr-xr-x    1 root     root     16777216 Jan  1  2000 temp3.bin
-rwxr-xr-x    1 root     root          693 Jan  1  2000 temp4.bin
root@radio:~# df
Filesystem           1k-blocks      Used Available Use% Mounted on
/dev/root                  896       896         0 100% /rom
/dev/mtdblock/4           2176      1580       596  73% /
/dev/mmc/disc0/part1    249728     33856    215872  14% /mnt
The easiest way to get a kernel running with the needed fs support is probably by downloading OpenWRT and building the flash image. When you are familar with this process, it is quite easy to change the settings for your kernel. Just go to buildroot/build_mipsel/linux and type make menuconfig. Go to file systems -> Partition Types and check "Advanced partition selection" and "PC BIOS (MSDOS partition tables) support". In "File systems" you should also check "DOS FAT fs support" and optionally "VFAT (Windows 95) fs support". When done just exit saving the changed and type make dep zImage to force a rebuild of the kernel. Then you can just rebuild your OpenWRT image and the new kernel will be included automatically.
The integrated Broadcom CPU BCM4712 used in the WRT54G provides a number of General Purpose Input/Output pins (or GPIO pins) that are used for various purposes in the router. We have been able to identify 8 such pins until now and these are assigned as follows:
| Pin | Direction | Name |
| GPIO 0 | (Output) | WLAN LED |
| GPIO 1 | Output | POWER LED |
| GPIO 2 | Output | ADM_EECS |
| GPIO 3 | Output | ADM_EESK |
| GPIO 4 | Input | ADM_EEDO |
| GPIO 5 | Output | ADM_EEDI |
| GPIO 6 | Input | Reset button |
| GPIO 7 | Output | DMZ LED |
The pins used in this project are the ADM_EESK, ADM_EEDO, ADM_EEDI and DMZ LED pins. The ADM_* pins constitute an interface used to configure the ADMTek switch chip. Since this only happens during the boot process, we are free to use these pins to our likings afterwards (the corresponding pins on the switch chip will be tri-state after configuration). The names of the other pins should be self explanatory. The direction of the pins can be individually programmed (even though this of course does not make sense for every pin).